How to Install SSL Certificate on Cisco ASA 5500 Series?
One crucial aspect of this security is properly setting SSL certificates on your Cisco Adaptive Security Appliance (ASA). This article will guide you through the prerequisites and configuration steps to establish a robust and secure SSL certificate infrastructure.
Prerequisites of Verifying Time and Date
Ensure that your ASA operates with accurate time, date, and time zone settings before getting into the SSL certificate setup. This step is crucial as SSL relies heavily on precise timing. Utilizing a Network Time Protocol (NTP), server is highly recommended for synchronizing your ASA’s time.
To achieve this, the Cisco ASA Series General Operations CLI Configuration Guide (version 9.1) provides comprehensive instructions for correctly configuring your ASA’s time and date settings.
Configuring SSL Certificates: The Right Approach
The SSL protocol demands that the SSL Server furnish the client with a server certificate, enabling the client to authenticate the server. However, it’s important to note that using a self-signed certificate is not optimal due to potential security risks.
A self-signed certificate leaves the door open for users to inadvertently configure their browsers to trust a certificate from a malicious server, posing significant security vulnerabilities.
Furthermore, the utilization of self-signed certificates results in a less-than-ideal user experience. Users connecting to the secure gateway would be greeted with security warnings, potentially causing hesitation and concerns about the legitimacy of your network.

How to Generate CSR Using ASDM for Cisco ASA?
Generating a Certificate Signing Request (CSR) is crucial in establishing a secure communication channel. This guide walks you through creating a CSR using your Cisco ASA’s Adaptive Security Device Manager (ASDM), ensuring a secure and streamlined remote access VPN environment.
Step 1: Navigating to Certificate Management
- Launch the ASDM and navigate to Configuration.
- Go to Remote Access VPN Certificate Management.
- Under “Identity Certificates,” click the “Add” button.
Step 2: Defining Trustpoint and Key Pair
- Provide a recognizable Trustpoint name in the designated input field.
- Choose the “Add a new identity certificate” option.
- For the Key Pair, select “New.”
- Opt for the desired Key Type, which can be RSA or ECDSA (refer to Appendix A for guidance on selecting between these).
- Select “Enter new key pair name” and assign a name for easy identification.
- Choose the Key Size; “General Purpose” is recommended for RSA.
- Click “Generate Now” to create the key pair.
Step 3: Configuring Certificate Subject DN
- Click “Select” to configure the Certificate Subject DN attributes.
- Configure the attributes based on your requirements.
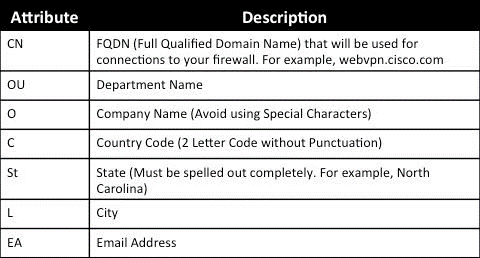
To add values, select an Attribute from the dropdown.
- Once you choose, enter the value and click “Add.”
QUICK NOTE: Third-party vendors might have specific attribute requirements for issuing identity certificates. If you need more clarification, consult the vendor.
Step 4: Fine-Tuning Certificate Details
- After configuring the necessary attributes, click “OK.” The Add Identity Certificate dialog box will display the populated Certificate Subject DN.
- Click “Advanced.”
- In the “FQDN” field, enter the Fully Qualified Domain Name used to access the device from the Internet.
- Click “OK.”
Step 5: Allowing CA Flag and Finalizing CSR
- Leave the “Enable CA flag in the basic constraints extension” option checked. It ensures only certificates with the CA flag can be installed on the ASA by default.
- If your situation requires bypassing this requirement, uncheck the option.
- Click “OK,” followed by “Add Certificate.”
- A prompt will appear to save the CSR to a local file. Click “Browse” to choose a location and save the file with the .txt extension.
QUICK NOTE: Saving as .txt allows the PKCS#10 request to be viewed with a text editor.
SSL Certificate Installation on Cisco ASA
Establishing SSL certificates is pivotal for airtight communication channels. Here, we’ll walk you through the seamless installation process of SSL certificates on your Cisco Adaptive Security Appliance (ASA) using both the Adaptive Security Device Manager (ASDM) and Command Line Interface (CLI).
There are two approaches to installing SSL certificates on your ASA, each catering to your specific needs:
Option 1: Install Certificates Separately in PEM Format
- Import the CA (Certificate Authority) and identity certificates in PEM formats.
- Alternatively, bundle the Identity certificate, CA certificate, and private key into a PKCS12 file (base64 encoded for CLI).
QUICK NOTE: If provided, install only the immediate, intermediate CA certificate from the CA certificate chain on the trust point used for CSR generation. Install the Root CA certificate and other intermediate CA certificates in new trust points.
Option 2: Install Using PEM Format with ASDM
- Access the ASDM, and navigate to Configuration.
- Select Remote Access VPN and go to Certificate Management.
- Click CA Certificates.
- Open the provided PEM-encoded CA certificate in a text editor. Copy and paste the base64 encoded CA certificate from the third-party vendor into the designated text field.
- Click “Install Certificate.”
- Proceed to Configuration and Remote Access VPN.
- Press Certificate Management and choose Identity Certificates.
- Select the previously created Identity Certificate. Click “Install.”
- Either choose “Install from a file” and select the PEM encoded Identity certificate or paste the base64 Identity certificate from the third-party vendor into the field.
- Click “Add Certificate.”
- Access Configuration and Remote Access VPN.
- Go to Advanced, then SSL Settings.
- Under Certificates, choose the interface where WebVPN sessions terminate (e.g., the outside interface).
- Click “Edit,” select the newly installed certificate from the drop-down list, and confirm with “OK.”
- Click “Apply.” Your new certificate now secures all WebVPN sessions that conclude on the designated interface.
Verifying Installation for Ensuring Success
To confirm that your third-party Vendor Certificate has been successfully installed and is operational for SSLVPN connections, follow these steps:
- Navigate to Configuration > Remote Access VPN > Certificate Management, and select Identity Certificates.
- The identity certificate from the third-party vendor should be prominently displayed to confirm the successful installation.
With these methods, you’ve expertly built another layer of protection into your network infrastructure. Your ASA is strengthened, your SSLVPN connections are secure, and you can traverse the digitally confidently.
How to Renew SSL Certificates on Cisco ASA?
As the cybersecurity landscape evolves, maintaining the validity of your SSL certificates is essential for safeguarding sensitive data.
This guide outlines a seamless process for renewing SSL certificates on your Cisco Adaptive Security Appliance (ASA), ensuring uninterrupted, secure communications.
Step 1: Generating a New CSR
- Regenerate the CSR (Certificate Signing Request) with the same attributes as the expiring certificate. This can be accomplished on the ASA, OpenSSL, or CA.
- Follow the CSR Generation steps as described in the previous section.
Step 2: Submitting CSR to the CA
- Submit the newly generated CSR to your Certificate Authority (CA).
- Generate a new Identity certificate in PEM format (such as .pem, .cer, .crt) alongside the CA certificate. If you’re using a PKCS12 certificate, you’ll also have a new Private key.
Renewing the Certificate with your CA
- If you’re working with GoDaddy CA, the certificate can be rekeyed using a new CSR.
- Access your CA account and navigate to the SSL Certificates section.
- Under the required domain name, click “View Status.”
- Click “Manage” to access options for re-keying the certificate.
- Expand the “Re-Key certificate” option and provide the new CSR.
- Save your changes and proceed to the next step.
- Your CA will issue a new certificate based on the provided CSR.
Step 3: Installing the New Certificate
Install the new certificate on a new trust point on the ASA, following the steps outlined in the SSL Certificate Installation on the ASA section.
By diligently following this guide, you ensure the uninterrupted operation of secure communications on your Cisco ASA. SSL certificate renewal is a critical aspect of network security, and your proactive approach is a testament to your commitment to maintaining a robust and safeguarded digital environment.
Wrapping up
Securing your network with proper SSL certificate configuration on your Cisco ASA is a pivotal step toward fortifying your infrastructure against potential threats.
By adhering to the recommended practices, such as synchronizing time settings and obtaining SSL certificates from trusted CAs, you ensure both the safety of your network and the confidence of your users.
Take the time to implement these measures and enjoy the benefits of a secure and trusted network environment.