How to Install an SSL/TLS Certificates in Nginx (OpenSSL)?
Welcome to the guide on installing an SSL/TLS certificate in Nginx (OpenSSL). This step-by-step tutorial will walk you through Nginx’s entire SSL installation process, ensuring a secure and encrypted connection.
Whether setting up a single server or multiple devices, rest assured that by the end of this guide, you will clearly understand how to secure each of them with the appropriate certificate.
Before we begin, you must ensure you have generated your certificate and completed the validation process. Please refer to our CSR Generation Instructions for assistance if you still need to do that.
Now, let’s delve into the instructions for installing your SSL/TLS certificate on Nginx, providing a robust security shield for your web servers and applications.
Follow along, and you’ll have your SSL/TLS certificate successfully deployed quickly!
Prerequisites for Installing an SSL/TLS Certificate:
To successfully install an SSL/TLS certificate on your server, ensure you have the following essential components ready:
Private Key:
The private key is a significant part of the SSL/TLS certificate installation process. It should already be present on your server or in your possession if you used a free generator tool to create your Certificate Signing Request (CSR).
Specific platforms, like Microsoft IIS, may not immediately reveal your private key, but the server retains it securely.
Intermediate Certificates:
These files help verify the authenticity of the issuing CA. Depending on your certificate provider, there might be multiple intermediate certificates.
If you received your SSL/TLS certificate in a ZIP folder, it should contain the Intermediate certificate(s), sometimes referred to as a CA Bundle. You can download the appropriate CA Bundle from the certificate provider’s website if not included.
Server Certificate:
This certificate is issued by a Certificate Authority (CA) for your domain. If you need help, you can download it by accessing your Account Dashboard and locating your order. The server certificate establishes a secure connection between your server and users’ devices.
By having these three key components ready, you’ll be well-prepared to proceed with the SSL/TLS certificate installation and enhance the security of your server and its communications.

Process for Generating a CSR for Nginx Using OpenSSL:
If you prefer to have complete control over generating your Nginx CSR through shell commands, follow these step-by-step instructions:
Step 1: Log in to Your Server:
Access your server via a terminal client using SSH for a secure connection.
Step 2: Run the Command:
Enter the following command at the prompt. Remember to replace “server” with your server’s name:
openssl req -new -newkey rsa:2048 -nodes -keyout server.key -out server.csr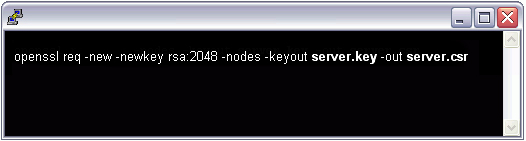
Step 3: File Generation:
By executing the above command, you initiate the generation of two files:
- Private-Key File: This file is crucial in generating the CSR and securing and verifying connections using the certificate.
- Certificate Signing Request (CSR) File: This file will be used to order your SSL certificate and encrypt messages that only the corresponding private key can decrypt.
Step 4: Provide Domain Information:
When prompted for the Common Name (domain name), type the fully qualified domain (FQDN) of the site you wish to secure.
NOTE: For a Wildcard certificate, ensure your common name starts with an asterisk (e.g., *.example.com).
Step 5: Organizational Information:
Enter your organizational information, starting with your geographic details, when prompted.
NOTE: You may skip this step if you have already set up default information.
Step 6: Creation of .csr File:
Upon completing the prompts, your .csr file will be created, containing the necessary information to obtain your SSL/TLS certificate.
Step 7: Order Your SSL/TLS Certificate:
Open the generated .csr file using a text editor. Copy the entire text, including the —–BEGIN NEW CERTIFICATE REQUEST—– and —–END NEW CERTIFICATE REQUEST—– tags.
Paste this text into the DigiCert order form (or the relevant SSL certificate provider you have chosen) to initiate the certificate issuance process.
Step 8: Save Private Key:
Ensure you save (back up) the generated .key file securely. You will need it during the SSL certificate installation process.
Step 9: Install Your Certificate:
Once you receive your SSL certificate from DigiCert (or your chosen provider), install it on your server to complete the SSL/TLS setup.
These instructions can confidently generate a CSR for Nginx using OpenSSL, leading to a secure and encrypted connection for website visitors.
SSL/TLS Certificate Installation Instructions for Nginx:
Follow these simple and secure installation instructions to set up your SSL/TLS certificate on Nginx successfully:
Step 1: Copy Your Certificate Files:
Begin by copying the Certificate Files to the appropriate directory on your server. To enhance security, ensure that only the root has read permissions for these files.
Step 2: Link Your Files:
Next, you need to concatenate the two certificates into a single file. Use the following command to achieve this:
cat your_domain_name.crt Intermediate.crt >> bundle.crt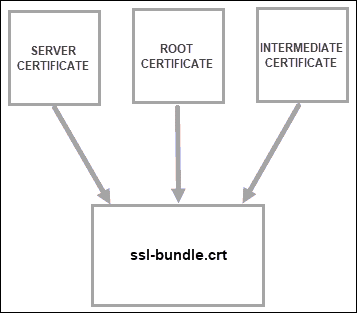
Step 3: Edit Your Virtual Host File:
Open your Nginx virtual host file for editing. Duplicate the existing server module (the non-secure one) and place it below the original. Then, add the following lines in bold:
server {
  listen 443;
  ssl on;
  ssl_certificate /etc/ssl/your_domain_name.pem; (or bundle.crt)
  ssl_certificate_key /etc/ssl/your_domain_name.key;
  server_name your.domain.com;
  access_log /var/log/nginx/nginx.vhost.access.log;
  error_log /var/log/nginx/nginx.vhost.error.log;
  location / {
    root  /home/www/public_html/your.domain.com/public/;
    index  index.html;
  }
}
Step 4: Restart Nginx:
To apply the changes, restart Nginx using the following command:
sudo /etc/init.d/nginx restartVoila! You’ve now successfully installed your SSL certificate on Nginx. Remember, sometimes, you may need to restart your server for all changes to take effect.
You can use an SSL Checker Tool for a more comprehensive analysis of your server’s configurations. If you require further assistance, don’t hesitate to contact our Customer Experience Department.
How to Confirm that the SSL Installation was Successful?
To verify the successful SSL certificate installation on NGINX, follow these simple steps to connect to your server via a browser:
Step 1: Open Your Preferred Browser:
Launch any web browser of your choice on your computer or device.
Step 2: Navigate to Your Domain Using HTTPS:
In the browser’s address bar, type in your domain using the HTTPS protocol: https://your.domain.com
Step 3: Look for the Padlock Icon:
Observe the browser’s address bar upon accessing your domain with the HTTPS prefix. A locked padlock icon should be displayed, indicating that the SSL certificate is now correctly set up on your server.
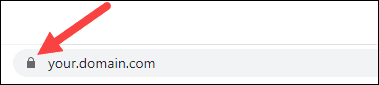
Step 4: Confirmation of SSL Certificate:
The locked padlock symbol signifies that your website’s connection is secure and encrypted with SSL. This ensures that data transmitted between your server and visitors’ browsers remains protected from potential eavesdropping or tampering.
By performing this quick check in your browser, you can confirm that your SSL certificate installation on NGINX was successful. This visual verification adds a layer of confidence for you and your website visitors, assuring them of a safe and secure browsing experience.
Troubleshooting Steps for SSL/TLS Certificate Installation:
To ensure a seamless SSL/TLS certificate installation, follow these troubleshooting steps and address any potential issues that may arise:
Step 1: Visit Your Site Using a Browser:
Open a web browser and access your site using the HTTPS protocol (e.g., https://yourdomain.com). We recommend using Firefox for testing, as it will alert you of any problems with your intermediate certificate installation. Ideally, avoid any browser warnings or errors.
Step 2: Verify Nginx Listening on Port 443:
If you immediately receive a message stating that the site is unavailable, it could indicate that Nginx is not yet listening on Port 443. Double-check your Nginx configuration and ensure it is set up to handle HTTPS requests properly.
Step 3: Check for Firewall Restrictions:
If your web request takes an unusually long time and eventually times out, a firewall might block traffic on TCP port 443, preventing secure communication to the web server. Confirm that there are no firewall restrictions obstructing HTTPS traffic.
Step 4: Investigate “Not Trusted” Warnings:
If you receive an “untrustworthy” warning, examine the certificate to verify its legitimacy. Pay particular attention to the Subject, Issuer, and Valid To fields, ensuring they match your expectations and reflect the correct certificate details.
Step 5: Review Concatenation of Certificate Files:
If you had to concatenate the certificate files, ensure that your primary certificate (e.g., your_domain_name.crt) has been correctly combined with the intermediate certificate. An incorrect combination might lead to SSL verification issues.
These troubleshooting steps can identify and resolve common SSL/TLS certificate installation challenges.
Ensuring a smooth installation process will help guarantee your website’s secure and error-free functioning with HTTPS enabled, promoting trust and confidence among your users.
Enjoy the increased security and encryption of your SSL/TLS certificate, making your website safer for your users!
Boost your Website Security with Authentic and Affordable SSL Certificates from Certera starting at just $2.99/year.