How to Manually Install A Chrome Extension In 2 Ways?

Quick and Secure Manual Installation of Chrome Extensions from a .ZIP
Chrome’s Web Store is the primary source for installing Chrome extensions; however, specific extensions exist outside its domain. Referred to as external extensions, these may incorporate unique features unsupported by the Web Store’s guidelines or beta versions.
This article presents two simple steps to effortlessly install external extensions in Chrome, whether in the form of ‘unpacked folders downloaded as compressed .zip/rar files or .crx files.
Before the quick installation process, it is crucial to acknowledge and address potential security risks associated with this method. Ensuring a safe installation process is paramount, and we will also provide insights on safeguarding your system during the procedure.
Let’s explore the hassle-free process of installing Chrome extensions from a .ZIP file, which barely takes a minute of your time.
Interpret the Threats to Manual Chrome Extension Installation Security
Google’s exemplary approach to encouraging users to download extensions exclusively from the Web Store stems from the inherent security risks associated with these add-ons.
The rationale behind this recommendation lies in the vast permissions that extensions acquire upon installation – essentially granting them access to observe all your browsing activity and the information you input into your browser.
This wide-ranging access creates a potential vulnerability, mainly when dealing with extensions that have been maliciously designed.
When extensions are submitted to the Web Store, Google subjects them to a thorough review process, identifying and blocking any extensions found to be malicious or harmful. However, the landscape changes when you manually install an extension.
In such cases, these add-ons have yet to be reviewed by Google, and the code within them may harbor malicious intents while remaining untested and unchecked for potential security flaws.
A Step-wise Tutorial to Manually Install a Chrome Extension
If you ever need to install a Chrome extension manually, fear not – the process is relatively straightforward. Follow these simple steps, and your desired extension will be up and running quickly.
Step 1: Download the Extension:
Begin by obtaining the extension you wish to install. Extensions are typically packaged as zip or rar files. No extraction is needed for ‘.crx’ files, as this format contains all the necessary data for Chrome extensions.
Step 2: Extract and Organize Files:
If the extension comes in a zip/rar file, extract its contents into a dedicated folder. Remember, Chrome requires continuous access to these files for the extension to function correctly.
Hence, avoid leaving the files on your desktop or in temporary download folders, where accidental deletion or tidying up might occur.

Step 3: Navigate to Chrome Extensions Page:
Open your Chrome browser and type ‘chrome://extensions/’ in the address bar to access the extensions page.

Step 4: Drag and Drop the Extension:
Now, drag and drop the extension’s folder or ‘.crx’ file from your file manager onto the extensions page in Chrome. If it’s a ‘.crx’ file, you might be prompted to review its permissions before adding the extension.
Step 5: Finalize the Installation:
Congratulations! The extension is now installed and ready to be used. You can manage it like any other extension, and its icon will appear in the Chrome Menu (if applicable) to the right of the address bar.
Step 6: Dealing with Developer Mode Notice:
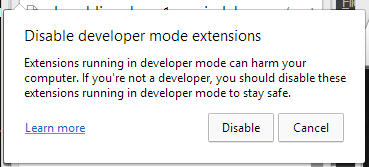
When you restart Chrome, you might receive a notice about the security risks of developer mode. To keep the extensions enabled, simply click “Cancel” when prompted.
Although this seems like a nuisance, it’s just one click and ensures the smooth functioning of your installed extensions.

These steps can manually install Chrome extensions with ease. However, it’s crucial to remain cautious and only install extensions from trusted sources to safeguard your browsing experience and maintain your online security.
Now explore the vast world of Chrome extensions to enhance your browsing experience to the fullest!
A Guide to Installing a Chrome Extension in Developer Mode
If you’re looking to install a Chrome extension in Developer Mode, follow these simple steps to unlock a world of possibilities:
Step 1 – Download the Extension:
Download the desired Chrome extension as a zip file to begin the process.
Step 2 – Extract the Contents:
Next, extract the contents of the downloaded zip file to access the extension’s files.
Step 3 – Open Chrome Extension Page:
Now, open your Google Chrome browser and navigate the extension management page. You can access this page by typing ‘chrome://extensions/’ in the address bar.
Step 4 – Activate Developer Mode:
Once you’re on the extension management page, look for the “Developer Mode” option and toggle it on to activate this mode.
Step 5 – Load Unpacked Extension:
After enabling Developer Mode, locate the “Load unpacked” option, usually presented as a button or an icon on the extension management page. Click on it to initiate the process of adding your extension.
Step 6 – Choose Extension Folder:
Upon clicking “Load unpacked,” a file explorer window will appear. Select the folder containing the extracted contents of the zip file from Step 2 and click “OK” to proceed.
Step 7 – Confirm and Install:
Chrome will process the selected folder and install the extension in Developer Mode. You will see the extension added to your list of installed extensions upon successful installation.
You have successfully installed the Chrome extension in Developer Mode. However, Developer Mode bypasses security measures and may increase the risk of installing malicious extensions. Therefore, only install extensions from trusted sources and disable Developer Mode when not required.
Now, you can explore and experiment with a broader range of Chrome extensions, enabling you to test and develop your creations or use unofficial extensions for specific needs. Enjoy harnessing the full potential of Chrome extensions in Developer Mode!

